Flowery Diaper Stacker

Flowery Diaper Stacker. 

Flowery Diaper Stacker.
After making the Cot Tidy and the Bed-sheet for my grandson's crib, I had enough flowery cotton print left from which, I decided to make a .

The main body of the stacker has been made from a single piece of cloth with no joints. It has been pleated on the top with a green colored double layered matching cloth, with my grandson's name "Dhairya", embroidered by hand and a flowery applique stitched beneath the name. A pink frill has been added for looks. The Diaper Stacker is very easy to open because of the velcro tapes attached in front.

The base is strengthened by a removable cardboard piece covered by a case of the same material, which makes the whole thing easily washable at home.

The Diaper Stacker is attached to the baby's crib with two matching ribbons made of the same doth

Pouch Style Baby Sling Pattern

Want to know  a sling carrier that is easy to make and reversible? With this baby sling pattern I'll have you making your own pea pod slings in no time! I absolutely LOVE these baby pouch slings - one of the most widely used items that I make by hand.
I tried several styles of baby carriers before settling on this style as my ultimate fave. The pouch style sling is the easiest to work with (no straps and things to tangle with), and keeps my baby nice and comfy. Did I mention they are great for breastfeeding? The day I tried one on for , I walked away with my daughter happily nursing away and was hooked from then on. I then went on to make a pouch style sling for my one month old son and am busy making more for some friends. The reversible pouch baby sling has been a big hit in my circle! 

Supplies List:
  • up to 2 yards each of two different fabrics
  • matching thread
  • some cotton batting for leg padding


Let's talk sizing...
Pouch style slings are not one size fits all. Depending on your size is how you determine what size to make your sling for the comfort of you and your baby.
I do offer size guidelines on the pattern, but for a totally custom tailored fit you may want to use a measuring tape loosely wrapped around over your shoulder and under the opposite arm.
For this tutorial I will go with a 30" pouch sling.
make a baby pouch sling
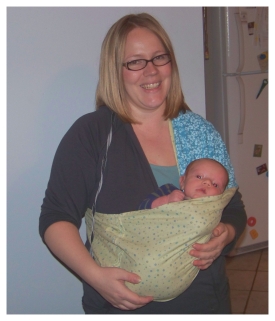
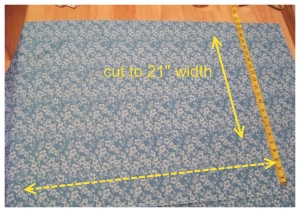
Begin by laying your fabrics on a flat work surface so they facing right sides together. The average width of the sling should be about 20-24". The width section is where your baby will actually sit. So you have the choice of making it a bit roomier or smaller depending on the size of your babe. I like mine to be about 20" wide so I cut my fabric to 21" in width (to allow for seam allowance). After cutting, your fabrics should be 20-24" wide by 62" (to allow for seam allowance).
Fold your fabric in half width wise so that it is 10 - 12" wide by 62". Fold it in half again the long way. Now it will be laid flat at 10-12" by 30".
Use the baby sling pattern piece to cut the ends of the fabric into a half moon shape. To cut them perfectly symmetrical after folding the fabric in half lengthwise, cut through all layers in a kind of quarter circle shape (see diagrams).

diy reversible baby sling

make your own reversible baby sling

Open up the fabric so you are back to two pieces lying flat right sides together. Pin these in place.
Next cut out two pieces of batting measuring about 8" by 2 1/2". Pin them down on opposite ends of the fabric as shown in the diagram.make a baby sling
Now sew the edge all the way around the fabric with a 1/4-1/2" seam allowance. Leave a 1 - 2 " opening for turning the fabric right side out. Make sure you are careful to sew the batting in place.
Remove all of the pins and turn the fabric right side out.

diy reversible baby sling pattern
Press the fabric with a hot iron and stitch the opening shut. Go back and stitch along the edge of the sling about a 1/4" from the edge. When you come to where the batting is turn the fabric and sew 2" inward from the edge and then straight to the end of the fabric about 8".

baby sling sewig seam
To finish you will need to sew the two rounded edges together. First fold the fabric in half, leaving one end jutting out from the other overlapping by 1/4 - 1/2". Pin this in place and then stitch along the very edge of the fabric that is overlapping. Use a hot iron to flatten the extra fabric over the stitching. Hold in place and stitch again over the overlapping fabric.

baby sling sewig seam
baby sling pattern

Add A Pocket!

If you have enough fabric left over a great use for it, is to sew a pocket onto the baby sling. This is great for keeping items such as a pacifier, tissues, or even a little bit of cash if you use your baby sling on outings. I know I use mine often while grocery shopping and doing errands.
To create a pocket for your baby sling is an easy and simple extra step. First cut a rectangle of fabric to whatever size would be suitable to you. Lay the piece of fabric right side down on your ironing board. Fold the top edge of the pocket down about 1/2' and iron in place. Now stitch the top edge down about 1/4" from the edge. Next fold and iron the other three sides of the pocket about 1/4". Pin the pocket in place where you intend to sew it onto the sling. Sew it in place stitching as close the edges as you can get (1/8" or less). Viola! You've got a reversible baby 

Baby Headband Pattern

Making these stretchy cotton baby headbands makes foe a perfect baby sewing project, and a great project for beginner sewers. You can even the baby headband pattern to make an adult sized headband. I make these all the time for me and my little ones. An absolute fave and go-to for keeping hair out of baby's eyes and for Mommy's bad hair days.
I think these headbands are even cute for boys if you are growing his hair out to a longer length. He can be a little rock n'  baby!
These are so simple and easy to make, you almost don't even need a pattern. I've provided a pattern for this project just for a quick way to skip a step, but they are so easy to make. You could easily make your own pattern for more of a custom fit.
What you'll need:
  • fabric scraps (1 or 2 different colors)
  • 1/2" width elastic waistband
  • sewing machine, thread

Print the baby headband pattern and trim the pieces from the paper. There is a pattern for 0-3 months and 6-12 months. For bigger sizes you can enlarge the pattern sizes. It's such a super simple pattern so adjustments will be easy and there is lots of room for screw-ups.
make infant headbands
Cut the fabric out using the pattern as a guide. I like to use two different complimenting coordinating fabrics. Give the front piece of headband fabric a pass over with a hot iron, and fold the second (back of headband piece) in half lengthwise and iron a crease on the fold.
sewing infant headbands
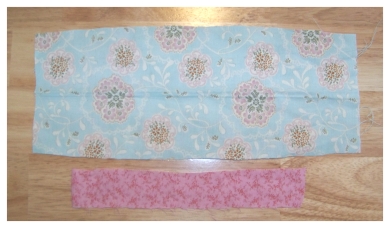
Using a hot clothes iron fold one edge (left or right) of the "front of headband" piece over by around 1/4-1/2" and iron in place. Fold this piece in half lengthwise with right sides facing and sew a seam along the outer edge with a 1/4" seam allowance. On the second (back of headband) piece sew a lengthwise seam also with a 1/4" seam allowance. Both pieces will form a tube of sorts. Pull both pieces right side out. A trick I use to make turning easy is to insert a safety pin in one end and push it through to the other end. Then, simply pull it out the end.
making baby headbands


Cut a piece of 1/2" wide elastic. I like to cut it a little long and then trim it to the right size after doing a quick fitting on the baby. Insert the end of the elastic into the middle of the smaller piece of fabric. Now insert this piece (fabric and elastic) into the larger piece of fabric at the end opposite of where the fabric is folded in (a.k.a the edge that is left rough).
Hand stitch a loose basting stitch around the larger outer fabric's edge and pull the threads to bunch the fabric up a bit around the smaller fabric and elastic.
Sew across the end of all the fabrics to fuse them together. Turn the entire thing inside out. Now (if possible) you are ready to do a quick fitting to get it to the perfect size your baby's head.
make baby hair accessoreis
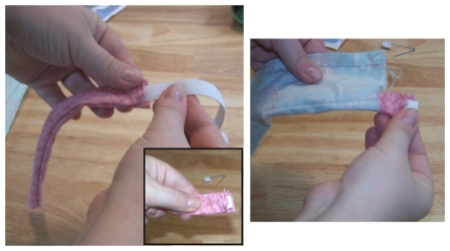
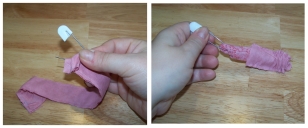
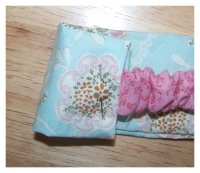
First things first, pull the end of the elastic out of the opposite end of the fabric so that you are scrunching the fabric up around the elastic a bit. When you get the desired length of elastic pin it in place. You can choose to trim the elastic as well if need be.
Sew another loose basting stitch around the end of the front headband piece. Insert the end of the back of head piece and pull the threads to bunch the fabric around it. Pin in place and also remove the pin holding the elastic the goal is to pin both fabrics and the elastic together. Do not remove the inner pin until you have successfully positioned the outer.
Sew all fabric and elastic in place and remove the pin. Viola! You can use this baby headband pattern to whip up cloth baby hair bands to go with every outfit!

Homemade Baby Blankets: Choosing A Fabric

The first step to making your own baby blankets is to decide what type of fabric you will use. My three favorite kinds of fabrics to use are , flannel, and super fuzzy fleece (or sometimes referred to as minky fabric).
handmade fleece baby blanketsIf your truly are a complete sewing newbie, you may want to forgo the stretchy fleece fabrics and go with a simple flannel or cotton!
For this tutorial we will actually be using two fabrics. You can mix and match the actual types of fabrics if you want. But in any case I like to match two coordinating colors or patterns.
My absolute fave is to pair a gorgeous print or woven pattern on cotton with a coordinating colored minky fleece. such a luxurious choice for a baby blankie! And as a gift it is divine. Most momma's will go gaga for a nicely chosen pair of fabrics!
I also am under the opinion that two well chosen flannel fabrics make an excellent receiving blanket. The fabrics will be paired and sewn together making for an extra double thick receiving blanket.

Sewing Your Baby Blanket

OK let's get to work!
For starters let me just say that there is no universal code saying just how big your blankie needs to be. I think it may be somewhat standard for them to be around 30" by 40" inches. But by all means if you have a different idea about how big or little a baby blanket should be then go for it! Create custom blankies with abandon!
So now that you have an idea of how big you want your blanket to be, it is time to begin cutting the fabric to fit your size specs!
Take your pre-washed and ironed fabrics and lay them so they are facing inward (right sides facing each other). Fold the fabrics in half, and then again in the opposite direction. You will be cutting the fabric on the corner.
make your own baby blankets
Divide all your measurements in half and this is how wide and tall you will be cutting. So for example, if you want to make a 30" by 40" blanket you will measure 15" from the corner in one direction and 20" in the other direction. Cut the fabric so that you are cutting away from the folded corner, which when opened will become the exact center of the blanket.
Open the folded fabric. Keeping the right sides together, sew along each edge of the blanket leaving a small opening to turn the blanket right side out. Seam allowance sizing is totally optional. I generally use about a half inch. Just a tip, if one of your fabrics is a stretchy one I find it easier to sew with the non stretch fabric on the bottom against the puler foot. It helps to keep the fabric from stretching out of proportion. Stitch sloowwlly. And carefully.
sewing homemade baby blankets
Turn the right sides out an push out the corners. You may want to iron the edges at this point. Sew the opening shut.
Sew a seam about 1/2 inch in from the edge. You can use a simple straight stitch or even a decorative stitch. I sometimes like to use a brightly colored coordinating thread.
Guess what? You're done! Now wasn't that easy! And fast. Have fun experimenting with different fabrics and colors. You can even make your own baby blankets with ribbon and decorative trims, or for the more advanced sewer, you can add a ruffle trim!

Make Your Own Infant Cap

baby hat patternMaking these adorable infant caps is one of the easiest projects on this site. And a very useful one, too!
I love this infant cap ! Not only are these hats easy to make, but they are super quick to make, too. Make one to match each and every outfit in your baby's layette!
When my daughter was in her infant stages I used this kind of baby hat like crazy. You could say I was baby hat crazy! Haha! They are great for fall and winter months, and even a crisp spring morning.
Don't be afraid to get creative! Go out and find some really bright and beautiful unique fabrics. Don't be afraid to shy away form the traditional pastel pink and blue.Don't get me wrong, those are cute colors. But you could make the most wonderful and unique baby hats with bold and bright print. I also recommend using a light jersey knit as it will stretch to accommodate different sizes.
The pattern (there are two styles!) I have provided is suited mostly for a newborn, but you can  it slightly to fit a older baby. And yes there are two styles of baby hats that you can make form this pattern. Well, kinda of three.
You can make the standard, folded brim hat. These are very much the same style as the little caps you bring home from the hospital (except with much more style).
You can also make a super easy to sew rough edge infant cap. Here's the thing about jersey cotton - you can completely avoid sewing a hem on the edges and it will not fray. I mean, you could just sew a sort of decorative seam along the edge if you'd like. But seriously, just leave the raw edges and it will have that little bit of natural and rustic feel.
Lastly, you can make a cute little stocking hat with or without a knotted top (my fave!).
To make any of these you really only need some good size fabric scraps. Like, less than a fat quarter. You could even make them out of old T-shirts.

Let's Begin Making Some Baby Hats, Shall We?

Step One: Start by printing out the infant cap pattern onto standard white paper. Trim the pieces form the paper.
Step Two: Lay out the fabric (you will only need about 1.5 square feet of fabric at most) on your workspace. The fabric should be folded in two so that when you cut the pattern piece you will have two equal pieces. Pin the pattern to the fabric (or use pattern weights) and use thepattern as a guideline to cut the pieces from the fabric.
infant cap pattern
Step Three: With right sides together and a 1/4" seam allowance sew the outer edges of the hat.
P.S. I used my serger for the hat pictured below. NO WORRIES at all if you don't have a serger. A regular straight stitch will work very well, probably even better!
make a infant cap

From here you have to decide which kind of hat you want to make! Do you want to make the rustic raw edge jersey cotton baby hat? Or maybe the folded over infant cap? And don't forget about the stocking infant cap!
For the raw edge infant cap you're already done. All you need to do is turn the fabric right side out and give it a little bit of a press with a hot iron. It's ready to wear!

For a Stitched Folded Brim Baby Cap...

With the hat still facing wrong side out, fold the bottom edge up to meet where the horizontal line crosses on the baby hat pattern. Pin it in place and iron the bottom edge flat. Stitch across the fabric about a 1/4" from where the raw edge lays.
make baby hat
Here is what it look like if you turn the hat right side out after stitching.
make baby hat
You could use it just like this if you like the look, or fold the bottom edge up yet again.
infant cap pattern

For A Raw Edge Stocking Hat

This is my personal fave! These are just soooo uber cute. So like above you'll be sewing a seam along the outer edges with a 1/4" seam allowance. These hats are best left with a raw edge, or with the bottom edge folded under by only 1/2", pressed an sewn in place.
When you are done sewing fold the hat right side out press the hat with a hot iron and wear as is, or tie the tippity top into a little knot.
baby cap hat pattern

Baby Sleep Sack Pattern

How would you like to make your own blanket sleepers? With this printable pattern you can make warm and cozy sleepy sacks to keep baby warm in this cold, cold winter weather.
You can make these sleep sacks in super heavy weight blanket fabric for the extra cold winter months, or even make them lighter with some nice cotton flannel for the fall and spring. Make them with upcycled sweaters for fab recycled baby gear, or even out of old T-shirts for a nice summertime sleep sack when the AC is blasting.
I created this sleepy sack the easy DIY way utilizing snaps to hold the upper parts shut. But you could easily use a zipper or velcro.

baby sleep sack patternSupply List:
  • baby sleep sack pattern
  • 1.5 yards outer fabric
  • 1.5 yards inner fabric
  • thread
  • snaps, zipper, or velcro

PDF Sleep Sack Pattern
Make Your Own Blanket Sleeper

. To make the sleep sack I recommend using two different fabric choices. I like to pair a cotton fabric with a interesting print with something soft and cozy for the inside. My absolute fave is super fuzzy fleece (a.k.a minky fabric). But you could also pair with some flannel, french terry, jersey cotton, or even another cotton print for a mild weather sleeper.
Begin by downloading the printable PDF pattern and trimming the pieces from the paper. The pieces will need to be taped together to form the full pattern pieces needed.
You will cut three pieces from each fabric. One back piece and two front pieces. You can also cut an optional button tab as I have shown on my sleeper (the piece that folds over at the top and snaps the sleeper shut). To cut this piece simple cut out a rectangle of fabric about 1.5-2" by 4".
sleep sack pattern
make baby sleep sack
Fold each front piece over by half an inch facing to the back of the fabric at the opening at the front of the sleeper. Iron the fabric in place. Match up and pin together the front and back pieces with right sides facing (folded edge at the middle. Do this for each set of different fabrics.
sleep sack pattern sewing
Starting at the bottom armpit area stitch the pieces together with a 1/4-1/2" seam allowance. Stitch all along the edge ending at the opposite side. Repeat for the second set of fabric pieces.
With right sides facing insert the outer fabrics into the inner fuzzy fabrics. Match the seams and pin. Match the seams at the arm holes and pin. Sew the two fabric sets together at the arm hole area on both sides.
Turn the fabric right side out and tuck the fuzzy fabric into place. At the upper shoulder, with right sides facing sew the two fabrics together with a 1/4" seam allowance. Match the wrong sides together again and, while matching seams, fold the edges around the neckline inward by 1/2" and iron and pin in place.
sleep sack pattern sewing
Sew along the neckline with a 1/4" seam allowance starting at the middle of the neck and ending at the very end at the middle and bottom of the sleep sack. Repeat for the opposite side.
To finish stitch the two front overlapping pieces together until about half way up the blanket sleeper. Install either a zipper, buttons, snaps, or even velcro. As an optional piece you can choose to sew on a button flap as shown on the sleep sack I made here on this page. I simply cut a small rectangle of fabric, sewed along one edge and turned right side out (to form a skinny tube of fabric. I folded the ends in and ironed in place. I then stitched the fabric flap onto the front of the sleep sack and sewed on a snap to hold it shut.
sleep sack pattern

DIY Baby Crib Bumpers Pattern

make your own baby crib bumpersI created these bumpers with some super cute flannel I found on the clearance rack. I paired the bumpers with a fitted sheet made from super soft minky fleece for a cute and luxurious bedding set. All for less than $20!
Let me start by saying that these crib bumpers are not hard to make at all. If you have no sewing experience this is a great project to start with. All you need is a little attention to detail and a basicsewing machine.
I want to show you not only how to make your own crib bumpers, but also how to make your own crib bumper pattern too. Making the pattern is so simple.
Here's what you'll need:
  • 1 1/2 - 2 yards of fabric (depending on the size of your crib)
  • cotton batting or foam sheets
  • ribbon
  • plain white printer paper or newspaper/pattern making paper
  • tape
  • pins
  • ruler and/or measuring tape
  • scissors
We'll start by making the DIY crib bumper pattern. So easy!
Begin by measuring your crib from the inside corners. Determine how high up the side you want the bumpers to go. Now add one inch to the dimensions for a 1/2 inch seam allowance (for beginners - the seam allowance is how far from the side of the fabric you will sew your seams).
To make your pattern all you will need to do is cut some large paper (newspaper> to the dimensions above. Make one pattern for the side bumpers and one for the end bumpers. I made my pattern by taping together regular white printer paper until it was the right length and width for my pattern.
You'll also want to go back and hold the pattern against the crib to determine where you want the ties to be located. While holding the paper in place simply make a mark where the ties would make the most sense to tie the crib bumpers to the side rails.
Viola! You've made yourself a baby crib bumper pattern!

Now To Get Sewing!

After washing, drying, and ironing your fabric, you'll need to lie the fabric down flat on your work surface. I use a over sized cutting mat but you can easily use your kitchen table or the floor, or whatever works for you.
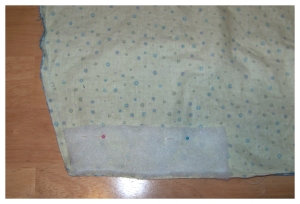
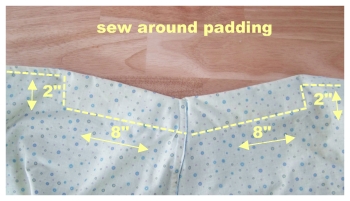
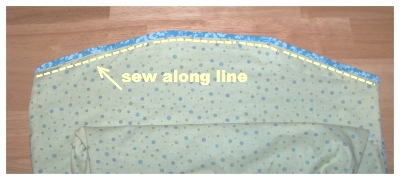
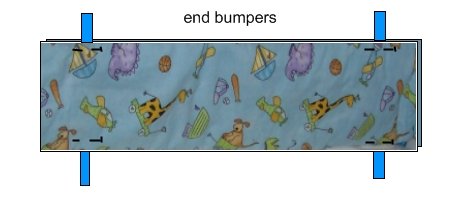
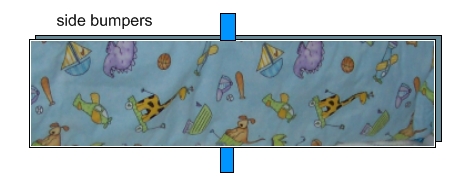
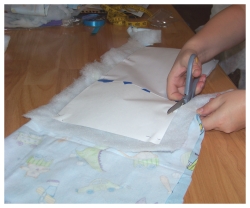
Lay the fabric down folded with the right sides (the front) facing inward. Now lay a sheet of cotton batting over this. The cotton batting can be whatever weight suits you. It all depends on how thick you want your bumpers to be.
Pin the crib bumpers patterns down over both the fabric and the batting. Use the patterns as guidelines to cut the fabrics and batting. Cut two sets for the sides of the crib and two for the ends. Pin the layers of fabric together.
Now to add the ribbon ties. Just a note - you canchoose to sew matching fabric ties. Basically just cut long rectangles of fabric, sew the edges and fold them right side out. I just prefer to use ribbon as it is so much easier and I like the decorative touch!
Cut the ribbon into 7-10 inch lengths. Make them all the same length and make pairs of two at a time. all together you will have 12 pairs of lengths of ribbon.
This next part is slightly tricky to explain. You want to pin the ribbons in place where you want them to be sewed. The ribbons need to be laid inside sandwiched between the fabric pieces.
Pin one set to the top and one to the bottom where you marked off on the pattern for the ties to be sewed. About an inch should stick out from the top and bottom of the fabric but the rest (longer pieces) should be tucked neatly inside. If you must, pin the ends in place so they do not accidentally get sewed in place.
The layers should go like this: 
  • layer one (bottom): fabric facing up
  • layer two: ribbons
  • layer three: fabric facing downward
  • layer four: cotton bating or foam

Now to sew it all together! Sew the fabric pieces together using a 1/2" seam allowance. sew all four edges leaving a 1-2" opening for turning the fabric right side out. Push the corners out and hand stitch the opening shut. Run an iron over the bumpers to finish them up with clean edges and corners. 
For beginners: make sure to make a test strip of all of the layers of fabric to get the right sewing settings on your sewing machine. Keep testing stitches on the test samples of fabric until you have the perfect stitch for the baby crib bumpers project.
You can use them as is at this point, but I actually like to go back and sew the corners together so it is one continuous bumper. I simply hand stitch the bumpers end to end with a coordinating thread until I've created a continuous circle. This is completely optional though!

Fabric Stash Project: Make a Patchwork Baby Quilt

patchwork baby quiltThis patchwork baby quilt is such an awesome way to use up all those  left over from other sewing projects. You can make a totally crazy quilt made from tons of different left over fabrics, or scavenge as much from each project as possible to make a quilt with coordinating colors and patterns. Not only will you find those fabric scraps put to god use, this quilt makes a fabulous baby blanket, wall decoration, or a gorgeous baby gift.


This baby quilt is super simple to make and sooo cute. A great project if you are new to sewing and quilting. The result is a beautiful and luxurious baby blanket that is great nurserydecor or to use as a nice warm baby cover-up.
To make this patchwork quilt simply pick out a few different fabrics that have coordinating or matching colors and patterns. For a really luxurious blankie I like to choose one heavier fabric such as fleece or faux minky fabric to use as both a backing and to add texture to the quilted side of the blanket. It is not fully necessary to choose a heavier fabric, although it does give the quilt that luxurious soft feeling and adds a bit of texture as well.
So, you'll choose one fabric to be used as the backing of the quilt (you will need one large piece of this particular fabric). I used one full yard for the backing of the quilt.
For the opposite side of the quilt you can choose to purchase fat quarters or 1/2 yards, or use up your scraps. These will be cut up into squares or strips to form the patchwork quilt. I chose four separate fabrics for my quilt. They were all left overs from a few other nursery projects I had worked on previously. So, Bonus! I got to make a quilt that totally matched the rest of mynursery!

How To Make A Baby Quilt

Whether you choose to make a baby quilt from your fabric stash leftovers or buy special fabric just for this project, there are different ways you could go about creating the patchwork.

Make a Fabric Stash Quilt

baby quilt pattern
If your are making your quilt from fabric stash leftovers chances are you only have smaller bits and pieces of fabric to work with. So you'll need to work this out by cutting your fabric into small square blocks of equal size.
Your going to create a square block to use as a baby quilt pattern. Really this just means cutting out a square shape from heavy paper or cardboard. It should be a complete square. Make this as big or little as you like. I made mine 7" by 7" and cut it out of cardboard to make a nice sturdy baby quilt pattern piece. Or you can print and use this supersimple quilt block pattern and skip a step.
How big you want to make your quilt is entirely up to you. It really doesn't need to be all that big since it will be used to wrap around tiny humans. I made mine about the same size as a receiving blanket.
Start by cutting all of your corresponding fabrics into squares using the baby quilt block "pattern". To sew the quilt together just sew the squares together, end on end.
make baby quilt
make baby quilt
How many squares wide do you want the quilt to be? I made my quilt four squares wide and five squares long. So I sewed together four squares end on end to create a strip, making sure the fabrics alternated. I then sewed a second strip just like it, this time not only alternating the fabrics within the strip, but also making sure that when I held both strips together no two identical fabrics touching.
Next I held both strips so the tops were facing, pinned it and sewed the strips together the long way. Keep sewing squares together end to end to create another strip, and add it on to the end of the quilt until you are satisfied with the size of the quilt. Make sure that all of the stitching has the same seam allowance.
how to make baby quilt

Making A Baby Quilt With Fabric Strips

If you have rather large pieces in your fabric stash, or you've purchased fabric to make a baby quilt, then you can make your crazy patchwork quilt the old fashioned way - with fabric strips.
Making a quilt by sewing strips of fabric is just as easy, if not easier than by using the block method I described above. All you have to do is cut long strips of fabric all at the same width. Say, long strips of fabric that are 5" long for example. Sew the strips together the long way, creating a sort of striped quilt piece. Then, with a yard stick or quilting ruler, cut the blanket into 5" strips all over again going in the opposite direction creating a long strip of fabric squares sewed together. Now all you have to do is sew those strips back together and you've got yourself a patchwork crazy quilt - baby sized.

Finishing The Baby Quilt

Once all of the quilt squares are sewn together, well this is where I like to go back and add a bit of detail before finishing the quilt up. For this particular quilt (pictured above) I picked two matching ruffled ribbon trims. I sewed them across the quilt to just cover the seams where the squares meet and are sewn together. I also tied some teeny bows and hand sewed them onto the seams in a few places where the fabrics all met together. It all made for a very sweet look.
To finish it all up I added a minky fabric to the back of the quilt to give it some bulk. I laid out the minky fabric across a flat work surface and then laid my sewn together baby quilt pieces over the minky fabric, using the quilt itself as a kind of pattern. I cut the minky fabric to the exact size of the quilt using the edges of the sewn squares as a guide. I then placed both fabrics together with their right sides facing inward and pinned them in place. I sewed the blankets together stitching about a 1/4" in from the edge. I sewed all four edges of the baby quilt leaving just an inch or two open for turning. I turned the fabric inside out and hand stitched the opening shut.
from there I took the quilt to my ironing board and smoothed everything out paying close attention to the edges of the blanket. I took it to my sewing machine to give it a last step finished look. I zig zag stitched about 1/2" in from the edge creating a border around the entire baby quilt. I used a nice bright matching thread to give it a bit of decorative edge.

Baby Burp Cloth Pattern

This baby burp cloth pattern is by far one of my favorite patterns I've created for Make Your Own Baby Stuff. It's the simple things, ya know? The thing is, these homemade burp cloths are soooouseful. They last forever and I end up using them for so many things aside from just the baby burp thang. And they make fantastic gifts to boot. I like to put together packs of homemade burp cloths and cute cloth bibs as gifts to new mommas.
Making these burp cloths is a fairly quick and easy project. I like to make them with terry cloth on one side for added leak protection and a flannel or colorful cotton print on the other. The terry cloth serves as a great way to wipe up any kind of mess the baby might dish out. It's so convenient since I tend to walk around with one on my shoulder practically 24/7 anyways. They get used for so many other household messes than just what baby throws my way.
burp cloth pattern
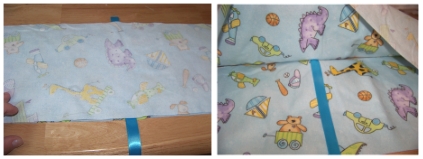
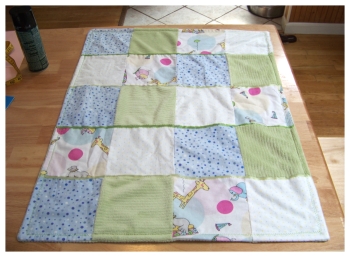
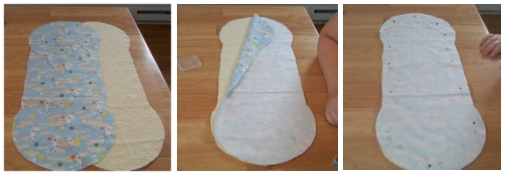
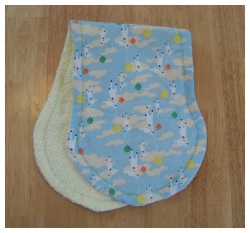
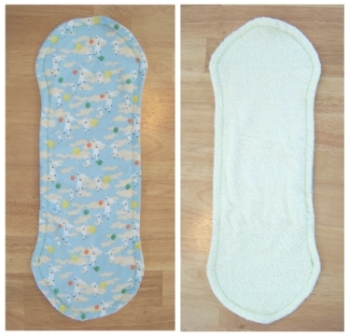
I first created this burp cloth pattern on newspaper, and later traced the pattern onto separate paper and transferred it to the computer for you all to use. The pattern is now available as an instan file. Simply print the file, tape the pieces together and start your sewing project.
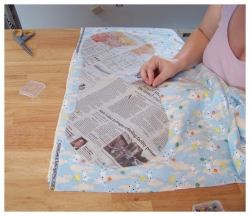
To make this baby burp cloth you will need two fabric pieces. This is a perfect fat quarter project! I like to use terry cloth for one side (old towels??) and a printed cotton or flannel fabric for the other.handmade baby burp cloth
I always recommend washing and ironing your fabric before you begin. Lay your two fabrics down on your work surface with right sides facing. Fold the fabric in half. Cut the pattern out from the fabric lining the left edge of the pattern up with the fold.
Pin down the pattern to the fabric (or use pattern weights) and cut the burp cloth pattern form the fabric. Cut through both pieces of fabric out using the pattern as your cutting guideline.
making baby burp cloth
Before sewing, make sure your fabrics are facing right side in. Pin them in place.
Sew both burp cloth pieces together about with about a 1/4" seam allowance. Sew all the way around the outside of the burp cloth leaving an opening about 1-2" wide. Turn the fabric inside out (actually outside in) and stitch the opening shut. You may want to go over the edges with a hot iron to smooth the seams out.
baby burp cloth pattern
Now to finish it up. Go back to your sewing machine and stitch another seam about a 1/4" from the edge all along the outer edge. You can use a straight stitch or even a zig zag or other decorative stitch. I like to use a contrasting colored thread to add a little decorative detail.baby burp cloths
Another great way to finish these baby burp cloths is to simply sew on some bias tape to the outer edges. This will give it a nice pop of color and a clean finished look. You could even make your own bias tape in a coordinating color or pattern.
I do hope you enjoy using this baby burp cloth pattern and tutorial. This project really is super fast and easy. Have fun creating heaps and heaps of burp cloths!

Breastfeeding Pillow Pattern

These Boppy style nursing pillows are one of the most used go-to's in my baby care arsenal. I used to own a Boppy and somehow lost it long, long ago. So I created this pattern so I could whip up easy and fast nursing pillows for myself and as gifts. Seriously these are so easy to make! It won't cost you a lot, and they are so useful!
I use them for, well, of course nursing. But I also use the pillow for tummy time, or just a cozy place to let baby hang out (supervised of course!). Once your little one is sitting up it's a great "safety net" to just place around him/her while they are playing. If they happen to have a topple over moment what a soft place to land! And I'll let you in on something - my 5 year old still has his breastfeeding pillow. He loves it! It must remind him of comforting things - he carries it around sometimes and keeps it on his bed as well. :-)

breastfeeding pillow patternSupplies List:
  • printable breastfeeding pillow pattern
  • a yard and a half of fabric
  • cotton or poly fill
  • coordination thread and sewing machine

DIY Nursing Pillow

I like to use cotton or flannel to make these pillows. You can choose to use the pillow as is, or make a few and just wash them on gentle cycle as they get dirty. OR... you could make your own nursing pillow slipcovers! I don't know about the rest of you, but my breastfeeding pillows get filthy. They are quite well used. Haha. So I just make a bunch of slip covers and switch them out when needed.
About choosing fabric... You only need about a yard and a half for the pillow and a yard and a half for the slip cover. For the pillow itself you can so totally get away with finding a fabric in the clearance section at the cheapest price possible. I like to use two different fabric for my slipcovers. I know - ooh lala! It's just me. I like a nice fuzzy minky fabric on one side for winter. It's so cozy! But you can always go on the cheap with slip cover fabric as well! They are only going to get spit up on them, am I right?

Sewing Your Nursing Pillow

Start by printing the breastfeeding pillow pattern. It comes to you as an instant download and is printed on 7 . Trim the pieces and tape them together to create the pattern.
You will cut 4 pieces to complete the pillow. Lay the pattern on the fold of your fabric and cut two times. The same goes for the long rectangular piece to be sewn between the layers.
sewing breastfeeding pillow
Begin by sewing the two long piece together end to end with right sides facing. Using a hot iron fold one end over by about 1/4" and iron in place. Fold one piece of the breastfeeding pillowpattern fabric in half to find the middle. Starting at the inside middle, with right sides together begin pinning the long piece (starting at the folded edge) along the entire edge of the outer pillow piece.

make breastfeeding pillow

Sew the inner layer piece and the outer pillow piece together with a 1/4-1/2" seam allowance. When you reach the opposite end fold over any excess and iron in place. Continue to sew in place until you reach the opposite end and back stitch to hold the stitches in place. Sew a seam across the two folded ends holding them strongly in place and double stitching at ends.
Pin the second outer pillow piece to the middle layer piece, again with right sides together. Begin sewing together with a 1/4-1/2" seam allowance. Sew the entire outer edge leaving a 2-3" opening for turning and stuffing.

sewing breastfeeding pillow

Turn the pillow right side out and begin stuffing with fiber fill. You can use the fill of your choice - cotton or poly fill, organic fiber fill, or for the most natural filling possible you can use washed sheeps wool. You can find some on Etsy or Ebay or even a local farm. Be extra careful with washing a pillow with sheep's wool filling, though. Raw sheeps wool will turn to felt with water and agitation so in this case you probably want to make a slip cover.
Stuff the pillow with as much filling as seems adequate to you. I used one full bag of cotton fill for the pillow shown here. I wouldn't recommend using less but you could make a much firmer pillow by adding more. Finish by stitching the opening shut.

nursing pillow pattern